
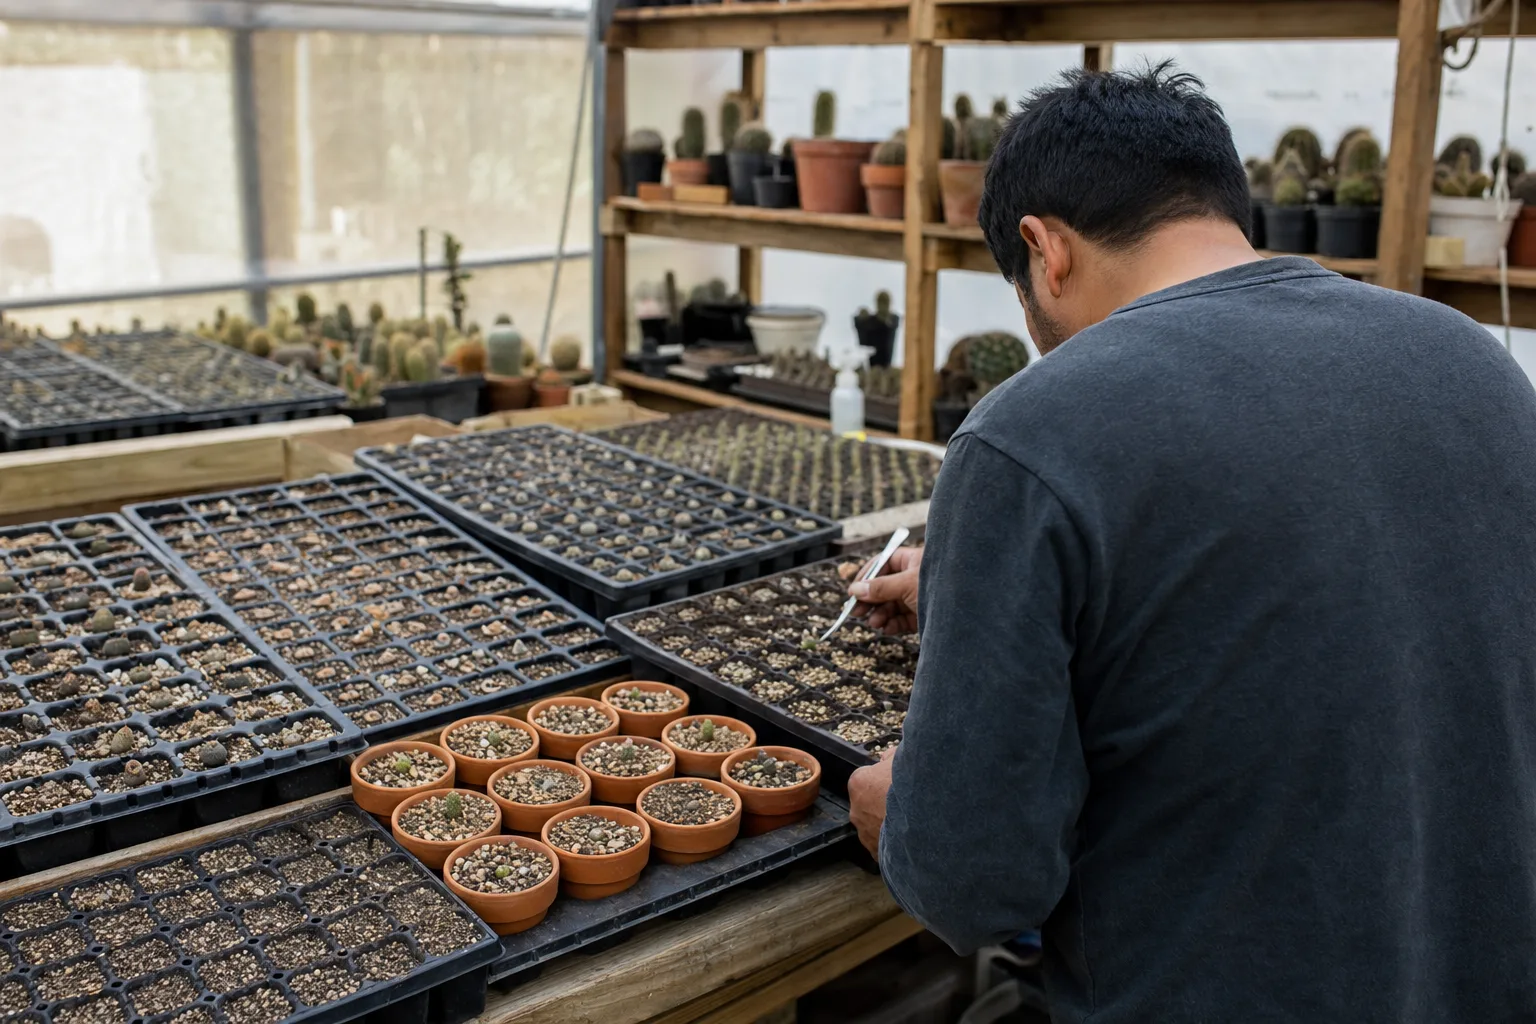
Trichocereus Seeds: Germination, Densities, and Transplanting to Pots
The seed route is the genetic basis of any serious Trichocereus program: it allows for high volumes, diversity, and lines adapted to ornamental use. In return, it demands hygiene, correct densities, and potting without stressing still fragile seedlings. This guide covers germination, densities, and transplanting with nursery criteria, aimed at producers and advanced enthusiasts working with T. pachanoi, T. peruvianus, T. bridgesii, and others from the South American columnar group.
In nomenclature, many of these species are discussed under Echinopsis; in ornamental trade, we follow the name Trichocereus for catalog clarity. The goal here is horticultural: healthy, uniform seedlings ready for fattening—not ethnobotanical uses.
Brief Seed Biology
The seeds of Trichocereus are small, black or dark brown, with limited reserves. They germinate best when fresh; viability decreases with years of storage in heat and humidity. They do not require aggressive scarification in most commercial lots: they need intimate contact with a moist medium, oxygen, stable temperature, and diffuse light (they are seeds that usually germinate on the surface or with minimal coverage).
Typical times: first germinations at 5–14 days; tails up to 21–28 days depending on the lot and temperature. A good fresh lot can exceed 70–90% germination under optimal conditions; old lots decrease and become irregular.
Installation: Tray, Container, or Sowing Bed
On a professional scale, fine alveolar trays, flat boxes, or terrarium-type systems (transparent containers with a lid) are used to maintain high relative humidity during the first months. Common requirements:
- Transparency or clear cover for light and monitoring.
- Drainage at the base (even if cultivated almost closed at the beginning).
- Possibility to seal or cover for 80–95% RH during germination.
- Labeling with species, seed origin, date, and lot code.
Disinfect reused trays with nursery protocols (heat, well-rinsed diluted hypochlorite, or authorized products). Damping-off (seedling fungi) almost always enters through poor hygiene or excess stagnant water.
Germination Substrate
Look for a fine, sterile or pasteurized texture, with drainage but the ability to maintain uniform moisture:
- 50% fine mineral (washed silica sand, fine pumice, fine perlite) + 50% sifted organic (light peat or washed coconut).
- Alternative 60–70% fine coconut/peat + 30–40% perlite, widely used in domestic sowings of the “takeaway tek” type.
- Avoid fresh compost and manures: salts and pathogens. A general framework on the family is in the entry of Cactaceae.
- Indicative pH 5.5–6.5.
- Moisten to field capacity before sowing: when squeezing a handful, only a drop should come out, not a stream.
Some producers pasteurize the mix (oven/steam/microwave on a small scale). In volume, work with quality nursery components and clean water.
Sowing and Densities
How to Sow
- Level and lightly compact the surface.
- Distribute the seed on the surface; do not bury.
- Optional: cover with 1 mm of fine silica sand to anchor and reduce algae.
- Spray gently or moisten by capillarity from below.
- Close the lid or film; place in diffuse light, never direct sunlight.
Indicative Densities
The density balances space utilization and seedling quality:
- Aficionado dense sowing / container 0.5–1 L: 50–100 seeds per container (~0.5–1 seed/cm² maximum in domestic practice; many approach 0.3–0.5/cm²).
- Professional tray: 0.2–0.4 seeds/cm² to obtain thicker seedlings and facilitate the first pricking out.
- Individual cells: 1–2 seeds per cell (thin to the most vigorous).
Excessive densities (>1 seed/cm² sustained) generate etiolation, competition, humid microclimate, and fungal outbreaks. Very low densities increase m² costs without benefit if the goal is volume.
A useful mental spacing: ~0.5 cm² per seed in careful sowings (approximately 0.5 × 0.5 cm to 1 × 0.5 cm depending on criteria), adjusting to the expected germination rate of the lot.
Germination Environment
- Temperature: 22–28 °C during the day; avoid peaks >32 °C under the lid (cooking).
- Light: diffuse; low-moderate PPFD (approximately 100–200 µmol·m⁻²·s⁻¹ in the very early phase). If seedlings turn red, there is too much light/UV; if they stretch filamentously, there is insufficient light or excess heat with low useful intensity.
- Humidity: maintain a closed circuit for the first 30–90 days depending on the protocol; ventilate for a few minutes only if there is extreme condensation dripping.
- Photoperiod: 12–16 hours with stable artificial light works well in chambers.
Sealed terrarium-type germination schools keep the lid on for months (even 3–6) to avoid lethal droughts in hypocotyls. Others ventilate progressively from weeks 2–3 to reduce fungi. Both work if the opposite extreme is controlled: neither anaerobic puddle nor total desiccation.
Post-Germination Care (First 3 Months)
- Do not transplant upon seeing the first seedling: wait for a minimum set of spines and some diameter (often 3–6 months depending on pace).
- If cottony fungus or damping-off appears: remove hotspots, improve local aeration, reduce surface humidity, and consider an authorized fungicide in ornamental crops.
- Fertilization: very diluted starting from 3–4 weeks post-germination (low EC, fraction of adult dose). Prioritize smooth continuity over “pushes”.
- Green algae on the surface: more light + less stagnant water; a layer of sand helps.
- Label losses: a record of % germination by lot improves future seed purchases.
Hardening
Before potting or moving to an open greenhouse environment, acclimate:
- Open the lid for 15–30 minutes a day for 3–5 days.
- Transition to half-day/full-day in 1–2 weeks.
- Gradually increase light; avoid direct sunlight during the first exposures.
- Allow the surface to dry slightly more between waterings, without reaching total crispiness of the community root ball.
Rushed hardening can kill more seedlings than a fungus: the cuticle is not yet ready.
Potting: When and How
Indicators of Timing
- Indicative height 10–20 mm or more, with clear spines and some “body”.
- Visible white roots at the edges of the community block.
- Germination module starting to become small (competition, irregular drying).
In aggressive commercial protocols, sellable or fattening material is sought in ~12 months; this implies careful fertilization and selection of vigorous ones during pricking out. In quality ornamental production, sometimes uniformity is prioritized over speed.
First Potting Substrate
Move to a mix that is more mineral than the germination one: 50–70% inorganic (pumice, coarse perlite, fine gravel) + stable organic. Containers 5–8 cm or deep cells with good drainage. The target pH remains around 5.8–6.5.
Pricking Technique
- Moisten the block the day before so it holds together without falling apart.
- Extract plugs or seedlings with as much root as possible; avoid pulling from the stem.
- Plant at the same depth as the neck; do not bury excessively.
- Water in with clean low EC water; do not fertirrigate heavily the same day.
- Shade 40–50% for 7–14 days.
- Resume gentle soak-and-dry watering when the substrate requires it.
Trichocereus seedlings often grow better for a time in groups; some producers do a first spaced community pricking and then individualize after 6–12 months. Choose according to labor and uniformity goals.
Densities After Potting
- Juvenile phase in 8–10 cm tray: pots almost touching at the beginning; separate when fattening to avoid lateral etiolation and facilitate mealybug inspection.
- Fattening in 1–3 L: leave air corridors; on tables, densities that allow seeing each neck.
- Second year / larger calibers: 30–40 cm between containers of 20–25 L is a reference for rapid fattening cited in pachanoi production guides; adjust it to your light and ventilation.
Density is not just m²: it is access to air, light, and IPM magnifying glass. A continuous sea of juveniles without corridors is a breeding ground for pests.
Health in Seedling Nursery
- Quarantine seeds of dubious origin; prefer suppliers with lot and year.
- Monitor sciariids (fungus gnats): they indicate chronic humidity; trap adults and dry the surface.
- Mealybug: rare in very young seedlings, but possible in nearby mothers; do not mix modules.
- Disinfect pricking tools between lots.
A clean seedling nursery feeds the rest of the nursery. If you also produce by cutting, maintain separate circuits to avoid contaminating seedlings.
From Seedling to Wholesale Product
The seed → juvenile → sale caliber cycle is longer than that of cuttings, but it provides controlled genetic homogeneity and volume. Many nurseries combine both routes: seed for the base and selection; cuttings for stable commercial clones. At Tricholand, wholesale production of columnars in Murcia is aimed at European supply with EU passport; if you need material already in sale caliber or wish to speak with the technical team about cultivation programs, the contact channel is the entry point.
Indicative Calendar (Northern Hemisphere)
Main Sowing: late winter to spring (February–April) to take advantage of the growing season. Second sowings possible in summer if there is a climate-controlled chamber.
Pricking Out: late spring to summer, with root heat.
Fattening: warm season with gentle fertirrigation and increasing light.
Winter: young seedlings in a temperate greenhouse, minimal watering, maximum vigilance for fungi due to condensation.
In the Southern Hemisphere, shift six months.
Common Problems and Corrections
- Zero Germination: old seed, low temperature, dry medium, or aggressive residual fungicide. Test a batch of 20 seeds.
- Germination and Death: damping-off; reduce free water, aerate, improve hygiene.
- Red Seedlings: too much light/UV; shade.
- Etiolated Seedlings: too little light or extreme density.
- Stalling After Transplant: damaged root or strong sun; review technique and shade.
- Salts on Surface: hard water + fertilizer; wash and lower EC.
Frequently Asked Questions
Should seeds be soaked?
A brief soak in clean water (a few hours) can hydrate dry lots, but it is not mandatory. Avoid prolonged soaks that drown embryos. Prioritize uniform moist medium.
When to give the first fertilizer?
After several weeks of life, very diluted. The seed brings reserves; excess salinity burns radicles.
Is seed or cutting better for a garden center?
For immediate sale of caliber, the cutting/propagation saves time. For in-house production and selection programs, seeds are essential. Many European operators purchase juveniles that have already been potted from specialized producers — check the catalog and request a wholesale quote.
Can I germinate in winter?
Yes, with a heat mat and artificial light. Without them, it is better to wait for stable temperatures.
Genetic selection and commercial homogeneity
Not all seedlings in a batch deserve the same fate. In the first or second transplant, eliminate etiolate, deformed individuals or those with clearly inferior growth if your goal is a homogeneous line. Preserve diversity only if you are breeding lines or looking for specific ornamental traits (spination, epidermis color, habit).
Document the origin of the seed (species, collector or supplier, year). This traceability prevents confusing commercial mixes between types of peruvianus and pachanoi, a common problem when purchasing seeds without documentation. Clear taxonomic classification protects the redistributor and the garden center.
If your business prioritizes speed of caliber over diversity, combine: produce a fraction by seed for genetic base and complete the sales volume with propagation of cuttings or purchase of juveniles from a specialized producer like Tricholand.
Conclusion
Successfully germinating Trichocereus is a detail-oriented craft: fine and clean substrate, moderate density, stable moisture without drowning, diffuse light, and a potting step with prior hardening. Those who control these phases turn a packet of seeds into a predictable flow of juveniles for ornamental propagation. To further explore professional cultivation and European supply, check out the blog of Tricholand and the sheets of varieties, or contact the nursery to request a catalog and terms for wholesale material.